
Setting Development Environment with WSL2, Docker and Github#
This quick tutorial is about setting Up a Development Environment with Windows 11, WSL 2, Docker and Github
Introduction#
Like any other operating system, Windows has its strengths and weaknesses. But what if you believe that the democratization of technology is best achieved through open-source solutions, and that Linux is the key to this future? What’s the next step for you?
If you’re working on a Windows 11 machine and want to develop in a Linux environment, what options do you have? And if you want to avoid the hassle of dealing with broken package dependencies, what solutions can you explore? If you want to integrate source code version control with your project which helps track changes, backup, team collaboration, smooth test and build then what options do you have? The answer lies in leveraging the power of Linux, Docker and Github.
Setting up a modern development environment on Windows 11 can be challenging, but with WSL 2 (Windows Subsystem for Linux 2) and Docker, developers can enjoy a seamless Linux-based workflow while leveraging Windows tools. This guide will walk you through setting up WSL 2, integrating Docker, and using Visual Studio Code for development.
Why are we exploring WSL 2 and Docker?#
- WSL 2: Windows Subsystem for Linux 2, a feature of Windows 11, allows you to run a full Linux kernel on Windows, providing better performance and compatibility than WSL 1.
- Docker: Docker is a platform for building, shipping, and running distributed application containers, making it easier to deploy and run applications in a consistent environment.
1. Installing WSL 2 on Windows 11#
WSL 2 allows you to run a full Linux kernel on Windows, providing better performance and compatibility than WSL 1.
Steps to Install WSL 2:#
- Open PowerShell as Administrator and run:
wsl --install - Restart your computer after installation.
- Set WSL 2 as the default version:
wsl --set-default-version 2 - Install a Linux distribution (e.g., Ubuntu) from the Microsoft Store.
- Open your installed Linux distribution and complete the initial setup.
To verify the installation, run:
wsl --list --verbose
wsl -l -v
2. Setting Up Docker Desktop with WSL 2#
Docker Desktop integrates with WSL 2, making it easy to run Linux-based containers.
Steps to Install Docker:#
- Download Docker Desktop from Docker’s official website.
- Install Docker and enable WSL 2 backend during installation.
- Open Docker settings and navigate to Settings > Resources > WSL Integration.
- Enable integration for your Linux distribution (e.g., Ubuntu).
- Restart Docker to apply changes.
Verify installation by running in WSL:
docker run hello-world
If successful, you will see a message confirming Docker is working.
3. Integrating Visual Studio Code with WSL and Docker#
Visual Studio Code allows you to develop inside WSL with full access to Linux tools and Docker containers. First let’s understand docker container and dev container.
What is Docker Container?#
Docker is a platform for developing, shipping, and running applications inside lightweight containers. It allows you to package an application and its dependencies into a container that can run on any system with Docker installed. Docker containers encapsulate the entire runtime environment, including the application code, libraries, dependencies, and even the operating system kernel. This ensures consistency across different environments. Docker is used widely in both development and production environments. It allows developers to create isolated environments for testing and deploying applications, making it easier to manage dependencies and ensure consistency. To create a Docker container, you typically define a Dockerfile that specifies the base image, application code, dependencies, and commands to run.
# Use an official Node.js runtime as a parent image
FROM node:14

# Set the working directory in the container
WORKDIR /app

# Copy the current directory contents into the container at /app
COPY . /app

# Install the application dependencies
RUN npm install

# Make port 8080 available to the world outside this container
EXPOSE 8080

# Define the command to run the application
CMD ["node", "app.js"]
What is Dev Container?#
Dev Containers are Development Focused and they are a feature provided by Visual Studio Code (VS Code) to create and manage development environments. They are designed specifically to set up and configure development environments within containers. They use Docker to create isolated development environments, but they are tightly integrated with VS Code. This allows developers to use the same VS Code instance both inside and outside the container, maintaining a consistent development experience. It uses .devcontainer.json configuration file to define the development environment. This file specifies the Docker image, workspace settings, extensions, and other configuration details. Dev Containers allow for extensive customization of the development environment, including installing specific VS Code extensions, setting workspace preferences, and running commands after the container is created
{
  "name": "Node.js Development Container",
  "image": "node:14",
  "workspaceFolder": "/workspace",
  "extensions": ["dbaeumer.vscode-eslint"],
  "settings": {
    "terminal.integrated.shell.linux": "/bin/bash"
  },
  "postCreateCommand": "npm install"
}
Enable VS Code with Dev Containers
To enable dev container in visual studio code you need to install plugin like “Dev Containers”, it is offered by Microsoft.
Steps to Install VS Code with WSL:#
- Download and install Visual Studio Code from VS Code’s website.
- Install the WSL extension from the VS Code marketplace, it is offered by Microsoft. Best for developers who want to work within a Linux environment on their Windows machine using WSL. It provides a seamless integration between Windows and Linux. Note: Remote - SSH is the Best for developers who need to access and develop on remote servers via SSH. It allows you to work on remote machines without needing to set up the environment locally.
- Open WSL and run:
code . - Install additional extensions inside WSL (e.g., Python, Node.js).
- Install the Docker extension in VS Code to manage containers.
4. Best Practices for Managing Projects#
To avoid compatibility issues, store all project files in WSL instead of the Windows file system.
Recommended Folder Structure:#
~/projects/
 ├── my_project/
 │   ├── src/
 │   ├── scripts/
 │   ├── Dockerfile
 │   ├── requirements.txt
 │   ├── .gitignore
 │   └── README.md
src/: Main source codescripts/: Utility scriptsDockerfile: Docker configurationrequirements.txt: Dependencies (for Python projects).gitignore: Git ignore rulesREADME.md: Project documentation
Note: ~ is home directory on WSL. You can use echo ~. In my case is /home/hari
5. GitHub Integration#
Version control is essential for collaboration. Using Git inside WSL ensures compatibility with Linux-based tools.
Steps to Set Up GitHub:#
- Install Git in WSL:
sudo apt update && sudo apt install git - Configure Git with your details:
git config --global user.name "Your Name" git config --global user.email "your.email@example.com" - Generate an SSH key for GitHub authentication:
ssh-keygen -t ed25519 -C "your.email@example.com" - Add the SSH key to GitHub (GitHub SSH setup guide).
- Clone a repository:
git clone git@github.com:your-github-username/your-project-repo.git
6. Reference to Microsoft’s Official Guide#
For additional details, refer to Microsoft’s documentation:
7. Overall Solution Architecture Diagram#
Below is a diagram showing how Windows, WSL 2, Docker, and VS Code interact: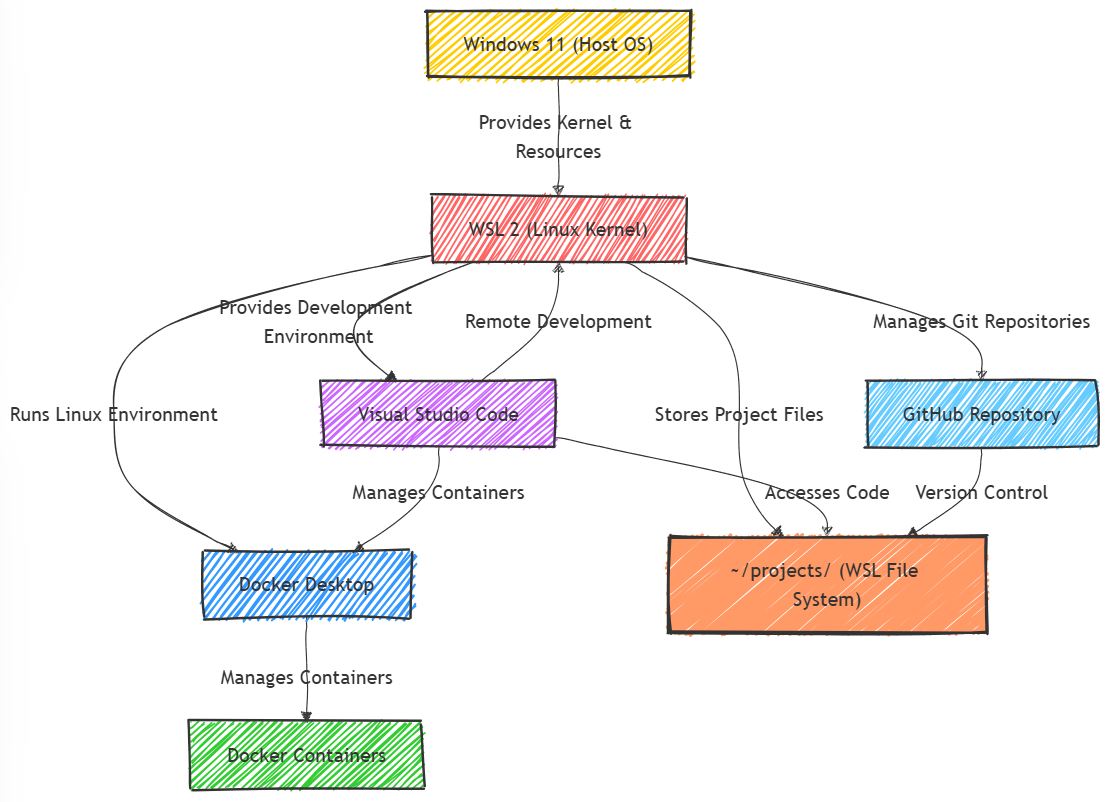
8. Conclusion#
With WSL 2, Docker, VS Code, and GitHub, Windows 11 provides a powerful development environment. By following this guide, you now have a fully functional setup for modern development workflows.

Comments: